Chirality Socks

I am so excited to introduce my newest design, Chirality Socks! This pattern has been one of my favorites to design and is so fun to knit up. The pattern is available now on Ravelry.

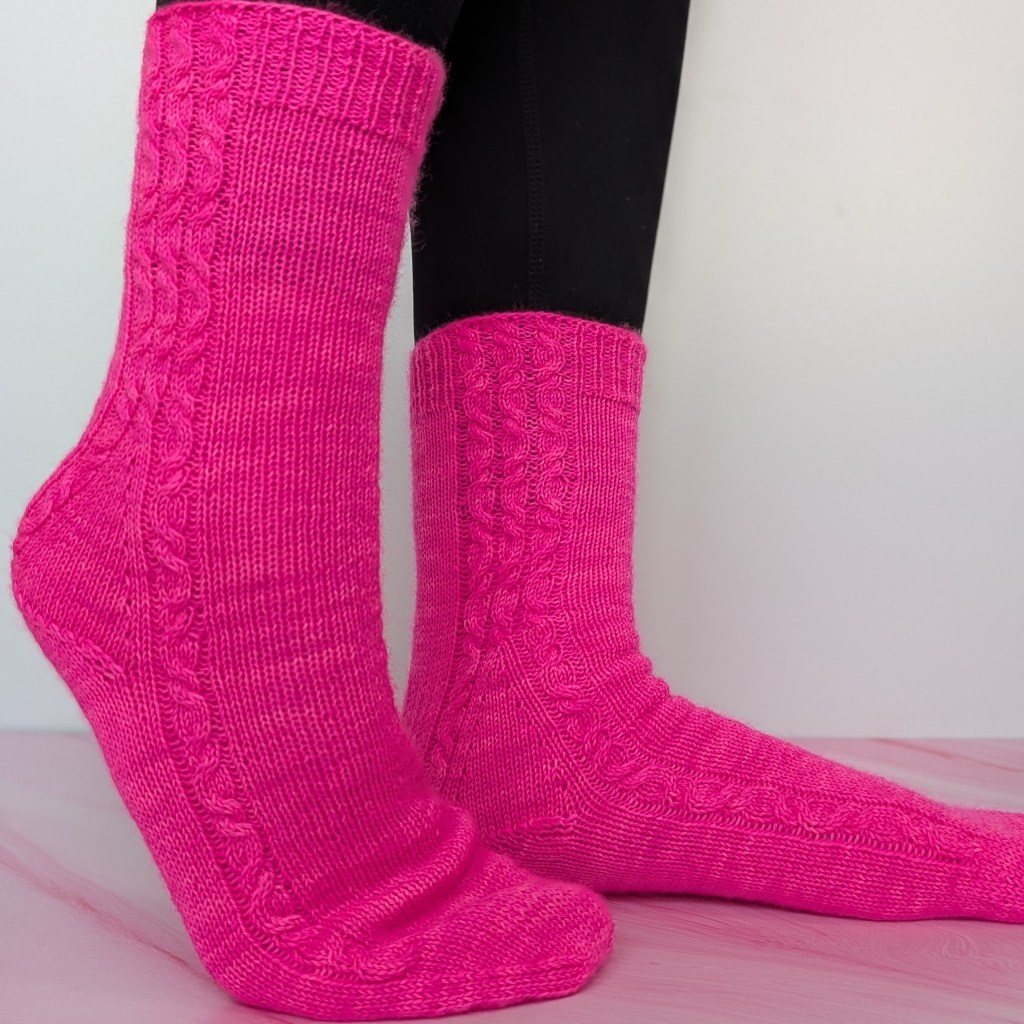
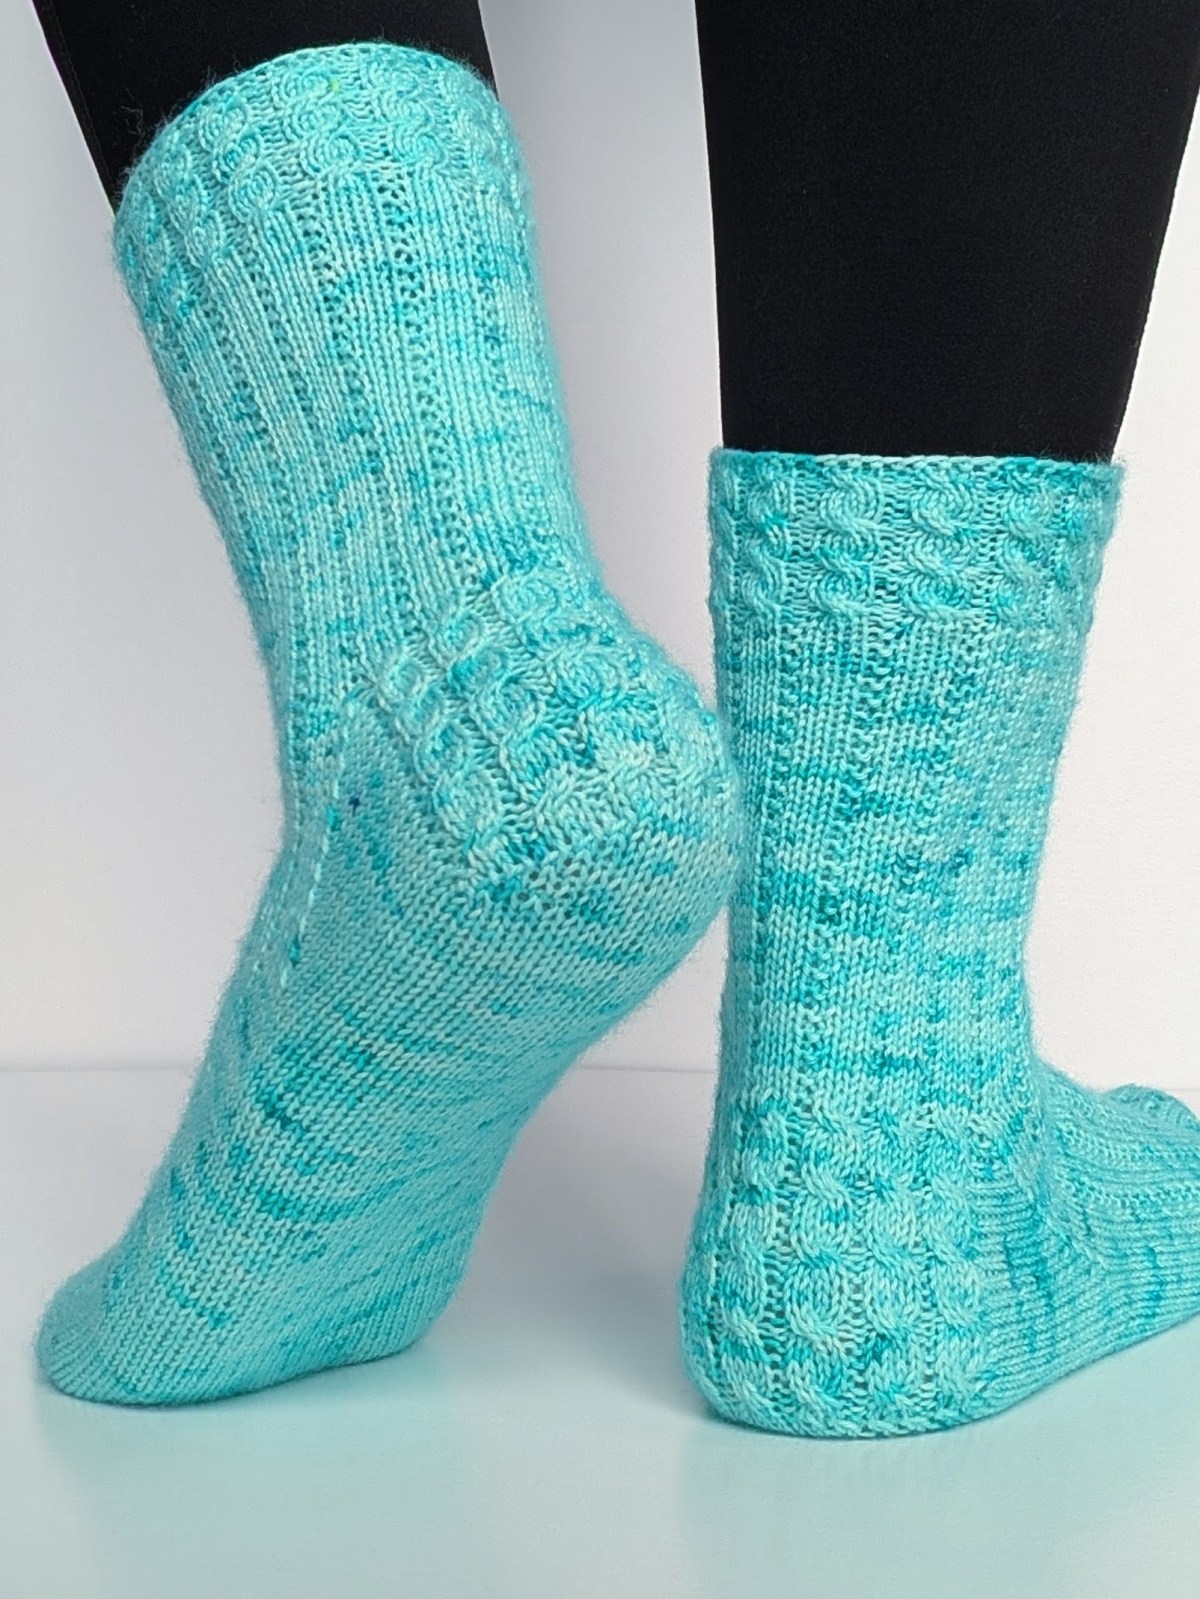
The Chirality Socks feature a lovely cabled rib pattern that travels from the cuff to the toe and even onto the heel! The cables on each sock twist in opposite directions, making them “chiral,” or non-superimposable mirror images. I loved adding all of these little details onto the socks and figuring out the best way to arrange them. I’ve always wanted a pair of socks that were cabled all over, and the Chirality Socks are the closest I’ve gotten to that so far. I love how these dainty 1-over-3 cables add a beautiful texture to the socks.

For the Chirality Socks, I chose this lovely, very lightly speckled yellow from Teal Torch Knits, called Dose of Sunshine. I used her TTK Sock base, which is probably one of my favorite sock yarns to design with — I feel like Christina’s colorways just “get me” with their brightness, joy, and neon amazingness, so I keep finding myself on her shop again and again to order more skeins.

Designing Challenges

When I’m designing, I like to work in increments of eight so that I can always include my standard sizing: 48 {56, 64, 72, 80} stitches (because I never want anyone to feel left out). The good news is that I can fit a lot of design into eight stitches, but sometimes I end up with something that I want to split, and for my 56- and 72-stitch size socks, this can be extra challenging since they won’t have a full eight-stitch repeat on the front and back of the sock.

I consider it a personal challenge to include all of the elements of the designs in all of the sizes and to make them as symmetric and centered as possible. For the Chirality Socks, this means that I needed to set up the 56- and 72-stitch sizes to have one more cable on the front of the leg than they do on the back of the leg. That way, they get maximum cabling and no interruptions to the cabled rib motif. It took a while for me to solve this problem, but in the end, I think the socks turned out beautifully.

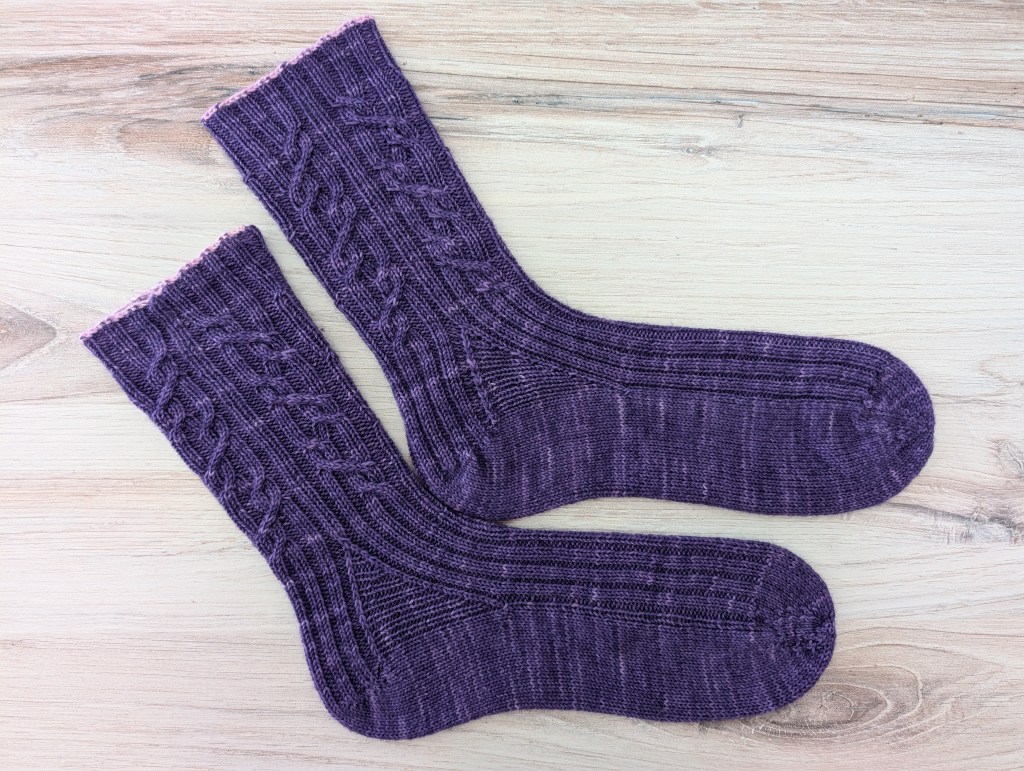
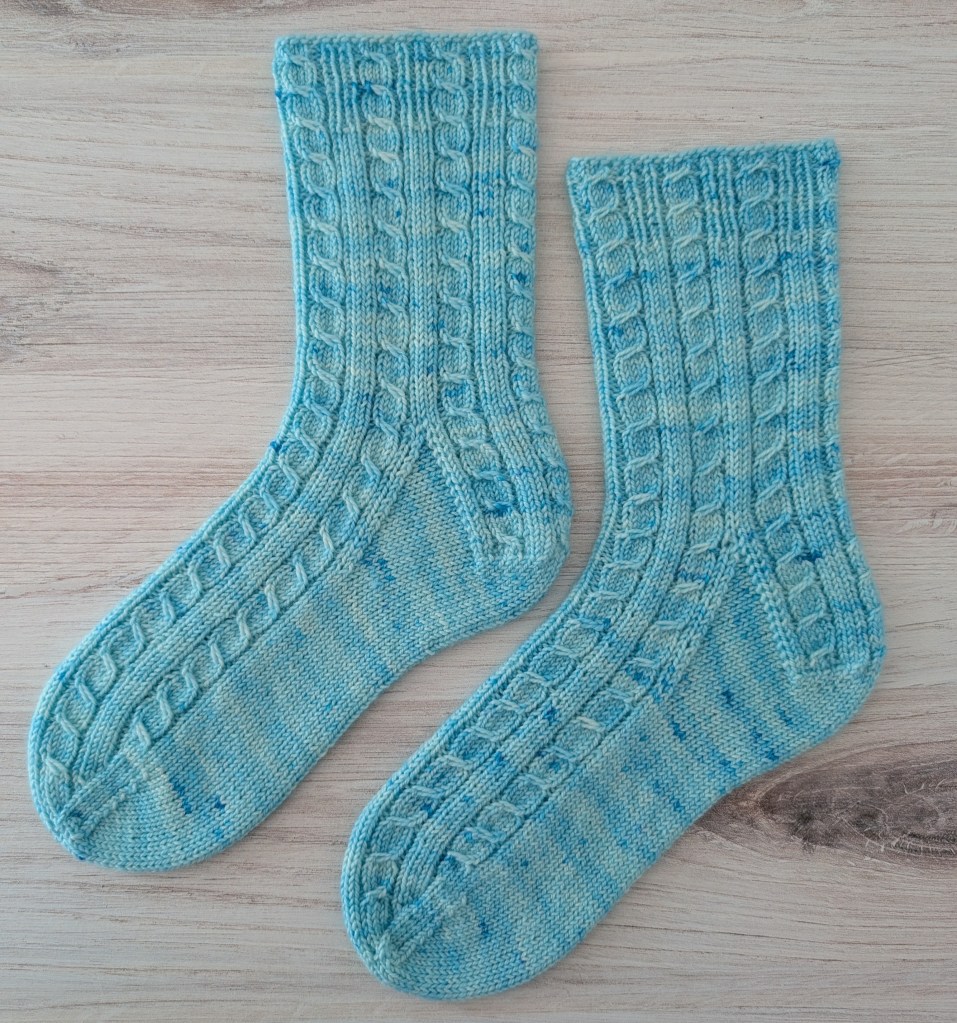
As a result, the 56- and 72-stitch sizes have a slightly different heel flap, where the pickups will proceed as they normally would in one of my slipped-stitch heel flaps. Here is a pair that I made for my daughter in this lovely blue from Adella of Lolabean Yarn Co. This pair was made using her Bean Sprout base in the Chevron Chalet colorway, which was an Eat.Sleep.Knit exclusive from a few years ago.

Picking Up Stitches

The even sizes of the sock (48 sts, 64 sts, and 80 sts) have the cables going all the way to the edge of the heel flap so that everything stays centered. This ended up being slightly different to pick up stitches. I always like to pick up the strand between the slipped-stitch edge and the stitch right next to it. I find that this makes a lovely, clean pick-up edge on both the inside and the outside of the sock, and it avoids gaps or bonus spaces in the pickup.

On a regular slipped-stitch heel flap, the neighboring stitch is always a knit stitch (when viewed from the right side of the sock), but in this case, the neighboring stitch is a purl stitch.

When the pattern was in testing, we realized that for the 48 sts, 64 sts, and 80 sts sizes, unless you pick up your stitches similarly to how I do them, you might end up with a slightly different look at the edge of the heel flap. I recorded a video tutorial to show you how to get this lovely edge that looks great from the outside and the inside of the sock. You can find the video here:

This technique can be applied to any heel flap where there is a slipped stitch edge with a purl stitch right next to it. The technique will also work for when there is a neighboring knit stitch, but it will look slightly different. Are you interested in seeing how I pick up stitches on my regular heel flaps? Let me know!

Appropriate Dye Styles

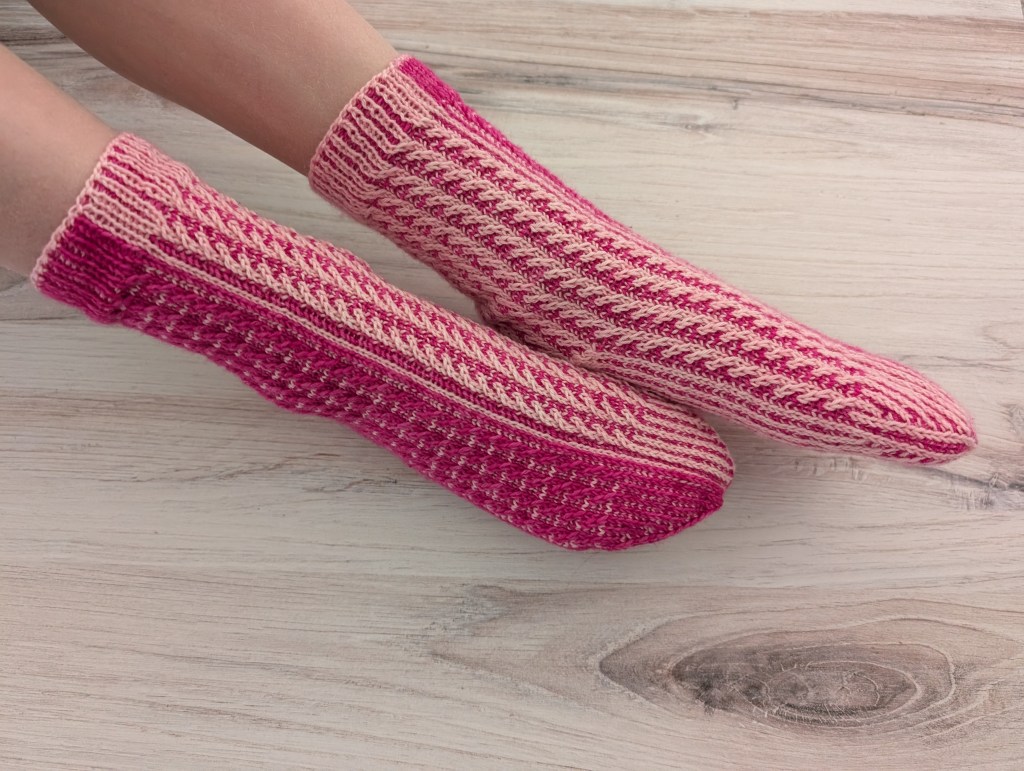
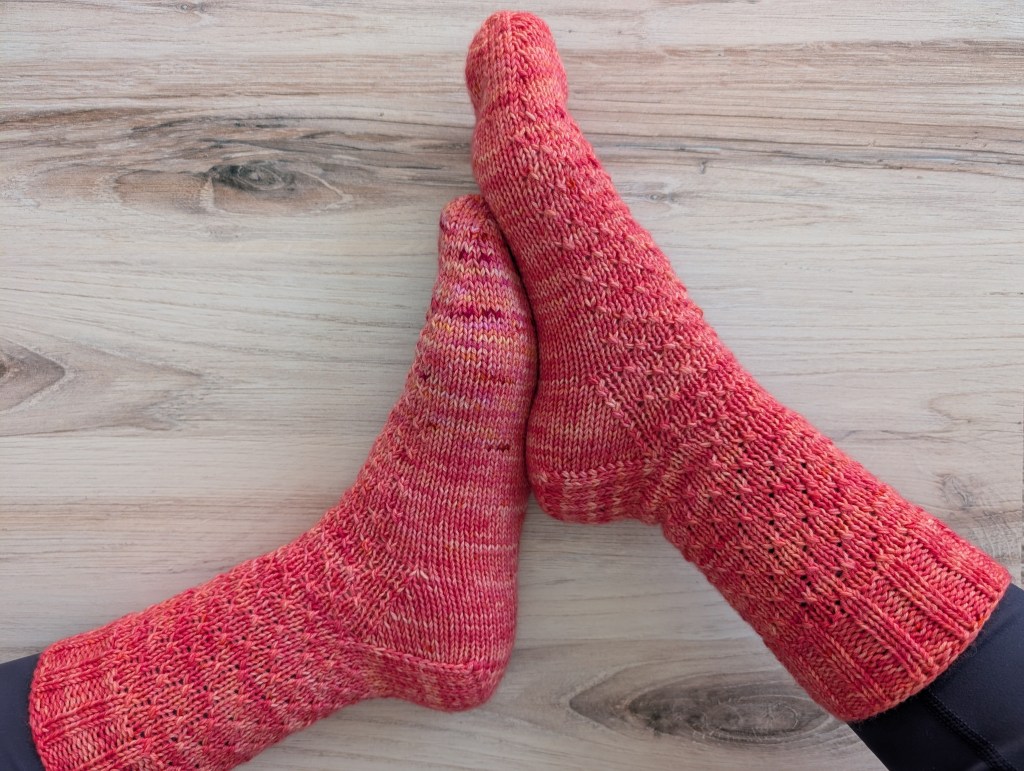
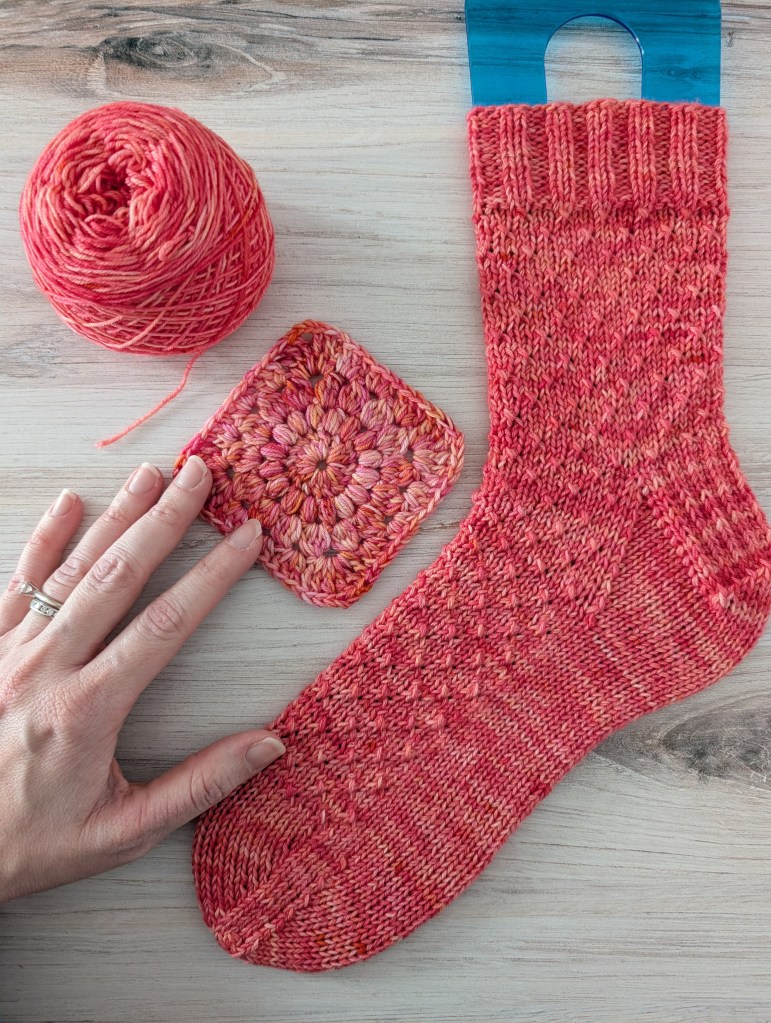
This design will look fantastic in any fingering weight wool or wool blend yarn in solid, tonal, lightly speckled, heathered, or low-contrast colorways. I would consider both of the colorways above to be *very* lightly speckled, but how does the sock look with some more speckles?!

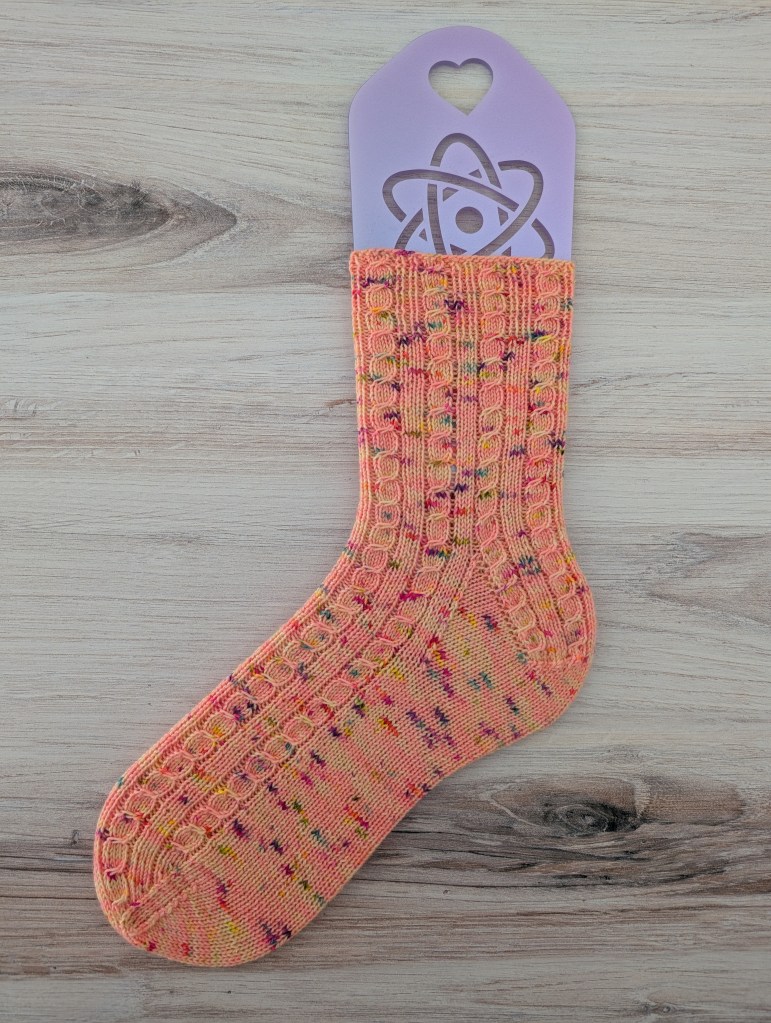
Personally, I think it looks fantastic! This gorgeous peach colorway is from The Lemonade Shop, and Heather is so talented at getting these teeny tiny individual rainbow speckles onto her skeins. Please forgive that there’s only one sock so far — the other one was the one I used for filming, and it just needs to be finished up, and then I’ll be wearing them all the time!

My lovely test knitters also knit up their socks in a variety of colorways. You can check out this page on Ravelry to see some of their gorgeous photos.

Thanks & Coupon Code

Thank you so much for being here and for reading through my design ramblings. Subscribers can use the code TECHNICOLORMOM to get 50% off of the pattern now through Friday, October 24, 2025. I can’t wait to see your beautiful Chirality Socks!

On the knitting front, I have accumulated an alarming number of single socks (*cough* more than ten *cough*), but I am working away on them and having so much fun. Are you hoping to see any design elements or techniques used in a future sock pattern? Let me know in the comments!

Wave Function Socks

Hello, crafty friends!

(Re-)Introduction

We have a lot of new subscribers here on the website, so I wanted to take a moment to welcome everyone who is just joining us. (Seriously, every time I get a notification that I have a new subscriber, I have a little \*squee\*.) I’m Amanda, and I am an aspiring professional knitter and knitwear designer in my free time. In my not free time, I am lucky to be a stay at home mom for my two children. You’ll see that a lot of my patterns are science-inspired. I earned a Ph.D. in chemistry (many) years ago and spent (many) years teaching college students how to safely work in the laboratory and how to draw organic reaction mechanisms. Now I get to apply all of my skills to crafting and keeping things semi-organized for my kiddos and amazingly supportive husband, @Technicool_Dad. I am lucky to get to volunteer at the kids’ school and to take them to all of the soccer practices and art clubs, and of course, car line pick up is one of my favorite activities — getting to see their smiling faces first thing after school is just the best feeling.

Pattern Inspiration

Today I am so excited to share that my newest pattern, the Wave Function Socks, has finally been published! When I took physical chemistry in college, quantum mechanics was one of my favorite topics. It was all math and functions and complex formulas, and my brain just loves a good problem. The wave function of a particle describes a few things, including the probability of a particle’s location being in a specific place. My friends and I liked to make jokes about how parts of our wave functions were vacationing on the beach — admittedly, this was a very low probability, but we thought we were funny and clever.

The Wave Function Socks presented a few good design challenges that I was keen to tackle. The first problem I tackled was determining the perfect formula for cable spacing so that the waves would be visible both on a sock blocker and when worn. After many swatches, I think I ended up with the perfect wave cables! For these socks, I really wanted to have the cable panels centered on the sides of the sock instead of on the instep, and for the cables to transition neatly to the foot and the heel. To accomplish this, I created a modified Strong Heel. This variation features slip-stitch reinforcement where your socks rub against the back of your shoe, and the symmetric increases on the side allow the cables to gracefully flare out over the ankle. Best of all, we have a look and fit similar to that of a heel flap and gusset, but with no picking up of stitches.

The Wave Function Socks feature an easily memorized pattern that will allow you to take them on the go or allow part of your mind to wander off on its own wave function beach vacation. Carefully placed increases and decreases mean that you don’t have to debate which size to knit — just cast on for your normal size!

The pattern will play nicely with any fingering weight merino/merino nylon blend yarn in solid, tonal, lightly speckled, gradient, or low-contrast colorways. The pattern has been tech edited and test knit and is all ready for you to cast on!

Coupon Code!

Thank you so much for subscribing to my newsletter! Please enjoy 50% off of the Wave Function Socks pattern now through August 8th with the code TECHNICOLORMOM.

New Free Pattern: Watering the Trees Beanie!

I’m so excited to share my newest pattern, the Watering the Trees Beanie! This pattern was designed intentionally for gift and charity knitting and is my gift to you. You can snag your copy of the Watering the Trees Beanie Pattern here.

For the past couple of years, I have endeavored to knit hats for my growing number of nieces and nephews in lieu of toys. In 2024, I knit a dozen hats in December. Although I failed to capture a photo of all of them together, I did share a reel on Instagram. Not all of the designs that I used have been published yet, but I did manage to get one of them written up, tech edited, test knit, and finally published!

Pattern Inspiration

The Watering the Trees Beanie is the hat version of my Watering the Trees Socks pattern that I designed a couple of years ago. The idea came about after my then-six-year-old and two-year-old decided to “water” our backyard trees. The event mostly involved the two of them running around and spraying each other with the garden hose, but they had fun, and the two maple trees in our backyard did manage to get a bit of water. When the light caught the droplets of water just right, a little rainbow added joy to our backyard fun.

The design features two mirrored cables to represent our two maple trees, and the textured ribbing makes me think of the streams of water from the garden hose. The pattern features my signature use of increases and decreases to make the cables pop without bunching or gathering the fabric beyond the cables.

Sizing

The Watering the Trees Beanie pattern includes sizes for the whole family, including baby, toddler, child, adult s/m, adult l, and adult xl sizes. It is designed to fit head circumferences from 14″ (36 cm) to 26″ (66 cm) comfortably. I prefer a generous fit in my hats, so I size my patterns with a looser fit in mind; you can size down for a snugger fit.

I have a 23″ circumference head and prefer the adult l size. You can see it here in purple.

I suspect that the most commonly knit size will end up being the adult s/m size, which I am modeling here in green.

Matching Socks

Should you decide that you need some matching cozy socks, check out my Watering the Trees Socks pattern. These socks are cozy and cabled, and my use of increases and decreases for the cables makes choosing a sock size easy – just pick the cast on number closest to the one you use for your favorite vanilla socks. You’ll want to stick with a similar favorite yarn and needle size for socks.

Gift Knitting

This hat knits up rather quickly using DK weight yarn, and I love it for gifts for anyone. I hope you’ll join me in making a few of these hats for yourself, your friends and family, and for donations to individuals and organizations who may need some extra love in the coming seasons.

Do you have any preferred organizations that you knit for? Let me know here! I’m planning to send a few pieces up to Knit the Rainbow and already have a couple saved away for them.

Sock Madness 2025: Qualifying and Round 1

Did you know there are such things as sock knitting competitions? There are! This year, I joined the Sock Madness 19 group over on Ravelry and registered to participate. This is the 19th year that the moderators have hosted the Sock Madness competition. The idea is that there is a qualifying round followed by seven rounds of competition, with a smaller number of knitters progressing to each subsequent round.

The competition is well known in the sock knitting community for its “madness”: crazy socks, unique constructions, and lots of challenges and new techniques. The idea is to try out something new while learning and knitting along in a friendly competition. The competition is free to participants, and we receive a materials list and some very obscure hints about the socks, but we don’t know what the socks will look like or which techniques will be used until each round begins. There were over 1800 participants in this year’s competition.

After participants let the moderators know that they’ve completed the socks, the moderators check the participant’s project page on Ravelry to “grade” the socks and make sure that the knitter followed the directions closely and met the minimum requirements.

Qualifying Round

The first pattern that we knit for the competition was Conjoined Sock Twins, a pattern by new designer Katherine Richmond. This pattern was unique because we cast-on to start at one toe, knit up through the foot, heel, and leg, then continued knitting the leg of the second sock down through the heel, foot, and toe. We all ended up with some crazy looking sock snakes before we separated the socks out and did a stretch bind-off in a contrasting color.

After separation, these socks were just like any other pair of socks, and they ended up fitting me really well! This was definitely fun, and the bonus was that there was no second sock syndrome for it. This was also the first time that I made a ribbed gusset for socks, and I enjoyed how stretchy it is. The cables in this pattern were really fun to knit.

Qualifier Sock Stats

Pattern: Conjoined Sock Twins by Katherine Richmond.
Yarn: Birch Hollow Fibers Sylvia Sock in Netherwing with Hedgehog Fibres Sock in Hush for the bind-offs.
Cast-On (started): February 16, 2025
Bind-Off (finished): February 23, 2025
Yardage: 360 yards
Size: 64 sts
Needle: 2.5 mm (US 1.5)

After the qualifying round was over, participants were sorted onto teams based on how quickly they completed this pair of socks and their answers to a survey about their normal knitting habits. There were 26 teams, sorted from Team A (on the more relaxed end) to Team Z (on the speedy end). I was sorted into Team Q for this year. This ended up being the perfect spot for me! We started with 52 members on each team.

Round 1

Participants don’t know what day or time the patterns for each round will be released. It’s a surprise! The times are distributed throughout the rounds to make the competition fair – there are participants from all over the world. This pattern was released at 1:13 am in my time zone. The first round pattern was the Day & Night Socks by Alena Malevitch. These socks were really interesting to knit. I made the 70 sts size hoping that the socks would be for me, but alas, they were too tight, so they went to my daughter. She is quite happy with them. This was my first time doing mosaic colorwork and intarsia for socks, and it ended up with a really neat effect. The socks are mirrored, and it took me about half of the first leg to memorize the pattern.

Round 1 Sock Stats

Pattern: Day & Night Socks by Alena Malevitch
Yarn: Emma’s Yarn Beautifully Basic in Poppin and Love Drunk
Cast-On (started): March 4, 2025
Bind-Off (finished): March 10, 2025
Yardage: 289 yards
Size: 70 sts
Needle: 2.25 mm (US 1)

This was an elimination type format, so knitters had two weeks to complete each pair of socks or until the first 45 knitters on their team completed the socks. I’m pretty impressed that I was able to finish each of these pairs of socks in less than a week! Luckily, I finished in time to secure a spot in Round 2. I’ll post all about that next time!

Alexander Socks!

Y’all! I designed another pair of socks! In 2019 years ago, I reached out on Ravelry to recruit test knitters for my third sock pattern, the Fireside Cable Socks. One of my volunteers, Jordan, knit a lovely pair of socks as she was testing out the pattern before publication. Fast forward to 2022, when I was able to regularly go to my local knitting group for Knit Night. I became fast friends with Jordan, who shares my love of pink, hand-dyed yarn, and all things cables. A long while later, we realized that these two Jordans were the same person! How small is the world that someone I interacted with online three years before ended up being at my Knit Night?!

Jordan is on the receiving end of a lot of my design-related brainstorming, and she is enthusiastic and encouraging as she reads and responds to all of my text messages. I’m so thankful that we had the chance to meet in person! We have spent a lot of time talking about socks and what would be our “perfect” sock design. Jordan really loves when patterns continue onto heel flaps, and we both really love cables.

So, I promised her a design with a fancy heel flap. And here we are! The Alexander Socks, named for my friend Jordan, are for those of us Hamilton fans who will never be satisfied with vanilla socks and want to elevate our socks without a huge commitment to fixing missed cable crosses or having to focus, focus, focus. When incorporating these cables, I used what has become my signature increases and decreases at the starts and ends of the cables so that you don’t have to think too hard about which size to make — just use your vanilla stitch count, and you are good to go. I used Teal Torch Knits TTK Sock in the colorway Tall Drink of Water for my sample, and I love how these light speckles look with the cables.

The Alexander Socks are knit cuff down, beginning with a German Twisted Cast-On and a beautiful cabled cuff. The leg of the sock features a relaxing 3×1 broken rib that continues down the foot of the sock. A cabled heel flap levels up the socks, and a traditional gusset makes for a great overall fit. The broken rib texture flows into the rounded toe for a polished look with a comfortable fit. Kitchener stitch is used to finish off the sock.

I’ve now knit three pairs of these socks — two for myself and a tiny pair for my 4-year old. The great news is that this pattern includes five cast-on sizes: 48 sts, 56 sts, 64 sts, 72 sts, and 80 sts. The 48 sts size is great for little kids with fingering weight yarn, or if you knit them with DK weight yarn, you’ll get a super cozy pair of adult socks. I use the 56 sts size for my 8 year old, and I knit the 64 sts size for myself. I usually use 72 sts for my husband or dad, and the 80 sts size is great for anyone who struggles with foot swelling or needs a looser fit.

I knit these pink socks using Leading Men Fiber Arts Show Stopper in the Pink Lemonade colorway. How amazing is that tonal?! I already have another pair of these on the go for my daughter, and I’ve got several skeins of yarn that would look amazing with these cables. What colorways do you think will look fantastic in these socks? I think this pattern will play nicely with any fingering weight merino/merino nylon blend yarn in solid, tonal, lightly speckled, or low-contrast colorways. I’m thinking Lolabean Yarn Co’s The City So Nice, They Named It Twice colorway would look amazing in this design — I used that colorway for my Concentration Shawl design a couple of years ago.

Are there any design features that you would love to see in a pair of socks? I’m really enjoying the fancy cuffs and heel flaps and of course cables!

Knitting DK Weight Socks!

Until December of 2024, I had never knit a pair of DK weight socks. I’m usually a fingering weight sock person. I love wearing them, I love knitting them, and I especially love collecting fingering weight yarns.

In December, I saw a friend had knit a pair of socks by holding fingering weight yarn doubled (i.e. holding two strands together), and I thought I’d give it a try. So for my Christmas Eve cast-on, I started a pair of Super Sprinkle Socks by holding my fingering weight yarn doubled.

I LOVE how these turned out! It took me less than a week to knit these, and I’ve been wearing them every chance I get. They are so cozy and warm, and I think they’ll wear a little longer than my usual fingering weight socks. (I’m tough on my socks, it turns out. Luckily, I’m the only person in my family who wears through socks, and the good news is I can always knit more!)

For this project, I chose my Super Sprinkle Socks pattern. I published this design in November 2023, and I love how this super easy texture works with speckled and tonal yarn. I originally designed these socks with fingering weight yarn in mind, and I knit the originals at a gauge of 9 sts and 12 rounds per inch using a 2.25 mm needle. For this sock, I used a 3.25 mm needle and knit a smaller size at a gauge of 7 sts and 9 rounds per inch. I used Jems Luxe Fibers Luxe Sock in the colorway Sirens.

Super Sprinkle Socks

When I designed the pattern, I included five sizes: 48 stitches (sts), 56 sts, 64 sts, 72 sts, and 80 sts. Most adults will find that the 64 sts or 72 sts sizes fit best, but I love knitting socks for my children as well, and my youngest wears a sock with 48 stitches, so I like to include the size in my patterns when possible. I usually knit the 64 sts size for myself. At my fingering weight gauge, that gives me 64 stitches divided by 9 stitches per inch equals 7.1 inches circumference for my socks. I did a little math, and it turns out that if I knit the 48 sts size at a gauge of 7 stitches per inch, I’ll end up with roughly the same circumference sock: 48 sts/7 sts/inch = 6.9 inches.

I’m pretty adventurous as a knitter and have no problem restarting something if it doesn’t work out, so I cast these on using a 3.25 mm (US #3) needle, which gave me 7 stitches per inch. I love the resulting fit!

I did run into a little snag along the way, however. When you use thicker yarn to make socks, the yardage is going to change. I used 56 grams of yarn for the first sock, and my skein only had 49 grams left for the second sock. That was a problem. Fortunately, it turns out that I have a color type, and I was able to find some leftover yarn from another project that matched up pretty well. The crochet granny square in the photo below shows some of the yarn I used: Suburban Stitcher’s Naranjita colorway on her sock base.

The color wasn’t a perfect match, but it was close enough that when I held it together with the yarn that I was using, it blended in pretty well. I was able to finish up the socks! Yay!

You can see a little bit of the color difference in the toe of the left sock (shown above), but I think it worked out pretty well! The slight color difference certainly won’t stop me from wearing them as much as possible.

These socks were such a quick knit and great fit that I made a second pair in January!

For this pair, I prepared to run out of yarn and used a contrast color for the start of the cuff and the toe of the socks. This yarn was Hue Loco’s Phyllis Sock base in the colorways Petunia (gray) and Oh Snap (green). I am so happy with how these turned out, and I know that there will be many more pairs of DK weight socks in my future. I started these on January 18, 2025 and finished them up on January 26, 2025.

I love how fun this texture is for these socks, but I’m definitely eyeballing some of my other patterns that include a 48 sts size for a future pair of DK weight socks. The Dragon Fairy Socks are also a contender, and I think the Candy Dot Grid Socks and Pause Time Socks would be fun in a thicker sock as well.

What do you think? Have you tried knitting a pair of DK weight socks? What patterns have you resized to get a fit that you love?

Time to Pause for a New Hat Design!

See what I did there?

I am so excited to share my newest design, the Pause Time Hat. This hat pattern is so special to me for several reasons. As I was designing this hat last year, the temperatures had just dropped where we live in Georgia. I can’t be a proper knitter if my family doesn’t even have hats, so I needed to get this one knit up as soon as possible. After the prototype was all blocked and dried, I tried it on my then three-year-old son to snap a few pictures and make sure I liked the crown, and he immediately walked over to my husband to show off his new hat. “Hey, Dad! Look at my new hat,” he said. “Mom made it for me!” This interaction just about melted my heart, and I wished I could pause time and hold onto that moment forever.

I made few adjustments to the hat as I wrote up the pattern, including an adjustment to needle size and the crown decreases, and I am so happy with how it turned out. The Pause Time Hat is the hat version of my sock pattern, Pause Time Socks. Earlier this year, I shared the socks and how I had just finished knitting a pair of these for my MawMaw. My MawMaw was so excited for the socks, and I shared daily updates with her as I was knitting them. I am sad to report that the socks that I knit for her have yet to be worn, as she passed away unexpectedly a couple of days after I finished knitting them.

I wasn’t ready to lose her, and I wish time had paused for just a moment longer so that we could have kept her here with us. I still miss her every day, and there are so many moments throughout the day where I see her impact on me and my family. When I read books to my son at night, I see her inscriptions in the front of the books saying how much she loves us and is proud of us, and I hope that I leave these kind of reminders for my own children as they are growing up.

The Pause Time Hat is a capsule for those special moments, and the break in the large cable is there to remind us to take that moment to breathe and remember. There were a few iterations of the hat before I got it just how I wanted it, and I know my MawMaw would be proud of the perseverance and problem solving that went into getting it right.

The Pause Time Hat is knit from the bottom to the top, beginning with a German Twisted Cast-On and 2×2 rib. Carefully placed increases transition the ribbing to tightly twisted cables without bunching, and the cables are continued into the crown decreases. This pattern will play nicely with any DK weight merino/merino nylon blend yarn in solid, tonal, or lightly speckled colorways. The hat is sized for the whole family and ranges from Baby to Adult Large. Photos show the Adult L on a 23″ head circumference. The pattern has been professionally tech-edited and test knit.

I have knit this hat up in several colorways by this point, including the lovely Neon Melon colorway from Teal Torch Knits that matches the original sock pattern. The Neon Melon was intended for me, but alas, it ended up being just a bit tighter than I like for my hats to fit, so into the gift pile it goes!

The pattern can be found over on Ravelry, and it’s 20% off from now until Wednesday, December 11, 2024 with the code PAUSETIME20.

Saturation Blanket

After publishing my Dilution Cowl pattern, I kept thinking about how lovely the cables and texture looked and how nice they would look together in a blanket design. I daydreamed about the corners on this blanket for months before I finally picked up some needles and yarn and started swatching. I love a challenge, and I knew I wanted the cables on this blanket to stun at the corners. The way the cables met at the corners had to be different from my Dilution Cowl and Concentration Shawl patterns because the cables needed to be continuous — they needed to go in the same direction all the way around the blanket instead of pointing towards one another at the corner. It took five or six tries, but eventually I figured it out.

I started out by calculating what the smallest size blanket I could make would be in order to get in a full repeat and make the cables continuous. This purple version was knit using a skein of Hedgehog Merino DK in the colorway Hush. While I ended up using a worsted weight yarn for the pattern, I was able to make sure that my corners worked.

After all of the calculations and pattern drafts, I knitted up this lovely turquoise blanket in a size big enough to cover up with. I am so happy with it, and I can’t wait to gift it to my new nephew. I called the pattern the “Saturation Blanket” in keeping with my chemistry theme for this cable and texture combination that I’ve used in previous designs. In chemistry, a saturated solution is one in which the maximum amount of solute has been dissolved in a solvent at a given temperature. If you’ve ever ordered iced tea and really wanted sweet tea, you likely found that after dumping in a few packets of sugar, quite a few crystals of sugar settled on the bottom of your glass. This is because the solution, your now only slightly sweetened tea, is saturated; that is, no more sugar can dissolve in the iced tea.

While working on this blanket for my sister’s new baby, I kept thinking about how this child will enter the world with their parents’ and sisters’ hearts full of love, or, if you will, saturated with love.

The faux rib/garter texture of the Saturation Blanket creates a squishy, cozy fabric. The edges of the blanket feature beautiful braided cables that entwine at the corners and continue along all four sides of the blanket, giving it an elegant, cohesive look. With plenty of rest rows and pattern interest, this blanket will fly off the needles.

The work on the pattern didn’t stop after I’d finished making my full-size sample. I really wanted knitters to be able to complete the project without getting stuck, so I knit another sample and photographed my progress to guide knitters through the applied edging that is used to connect the cables along the top and bottom of the blanket.

I filmed a series of short video tutorials to help with any techniques that might be new to knitters, such as the Dec-9-to-1-k that helps make those beautiful cables connect to one another. And finally, I had the pattern tech-edited by a professional editor and test-knit by my lovely volunteers Cindy, Cyn, and Wilma.

This pattern can now be found on Ravelry, and if you use the code SATURATION20, you can save 20% from now until October 25, 2024. I can’t wait to see your beautiful new heirloom being gifted to yourself or your knitworthy loved ones.

Discovering Embroidery

Over the last month or so, my Instagram ads have been filled with cross stitch, modern embroidery, and punch needle kits and patterns. I clicked through a few of them and found a few that I really liked the look of, but I hesitated because do I really need a new hobby? Do I really want to order something from IG when I’ve had a bad experience in the past? While the answer is probably “no,” when I took my little one to the library for storytime and encountered a display about how March is crafting month, I decided to take that as a sign for “yes.”

My Experience & Review

I picked one of the kits that I liked the best, and I put in an order. What happened after that? Well, Amanda has fallen down the rabbit hole. My first order (there have been…a few) was for beginner kits of “Bee Happy” and “Flora the Cat” from Clever Poppy. Y’all, I cannot even overstate how incredible my beginner experience has been with modern embroidery. My Clever Poppy kit, which was packaged beautifully, included a code to download the pattern and view tutorial videos on their website.

The user interface for the tutorials is fantastic, and Julie walked me through everything from dressing my hoop and tracing my pattern to making French Knots and Lazy Daisies, with check ins after each step of the way. I did not need to look up any information to complete the piece. The tutorial videos are so good, and each one is only a few minutes. Julie included tips and common things that newbies do compared to experienced embroiderers. She maintained an energetic, positive, and encouraging vibe throughout the experience.

My in-progress “Bee Happy” project. The tutorials were incredibly detailed, and I definitely recommend this as a first kit.

Completed “Bee Happy”

I made “Bee Happy” first, and I am so happy with how it turned out. It is currently living on my wall in my bedroom, and I am well on my way to filling my home with handmade art. (We already have tons of knitted gnomes.) This was my very first attempt at learning embroidery.

My completed “Bee Happy” project. This pattern is by Julie Stuart of Clever Poppy.

I started “Bee Happy” on March 13, 2024 and finished it on March 15, 2024. I did not make any modifications to the pattern. One of the things I am loving about my embroidery experience is how quickly you can see progress in your project. With knitting, sometimes I can work on a project for hours and only see minimal progress. Embroidery keeps my mind from wandering because I need to pay attention to each stitch, whereas with my knitting, I can almost do it in my sleep, and sometimes my mind is all over the place.

Recommendations

Do I recommend one of these kits from Clever Poppy for people who are interested in learning modern embroidery? Before I give you my answer, here are the caveats: (1) this is not a sponsored review in any way; I do not benefit from you purchasing from them in any way other than getting to potentially chat with you about our new hobby, (2) I did not try out kits from other brands, and (3) while I had never tried embroidery before, I would consider myself an experienced crafter (knitting, crochet, quilting) and did not encounter any challenges or difficulties. The few emails I have exchanged with the Clever Poppy team since I began learning embroidery have been answered quickly and effectively.

So, do I recommend it? Absolutely yes. The price point ($50) is comparable to what I would pay for a skein of yarn ($30), pattern ($5), and set of knitting needles ($15), and the tutorial and interface is fantastic. Plus, they have a beautiful website.

Flora the Cat

After I finished up my “Bee Happy” kit, I immediately started on “Flora the Cat.” My daughter loves cats, but we cannot have one due to allergies, so I thought she would enjoy this piece. I am planning to include it in her Easter basket to hang in her bedroom.

My completed “Flora the Cat” project. This pattern is by Julie Stuart of Clever Poppy.

I started this project on March 16, 2024 and finished it on March 21, 2024. I did not make any modifications to the pattern. I loved making the woven roses, and I think the cranberry-colored French Knots are the most beautiful touch. I also loved learning Satin Stitch and Julie’s method for tapering your stitches to make gorgeous petals. I love how she turned out!

Want to Join Me?

Have I convinced you to try out embroidery? Of course, I do not want to push you in a direction you weren’t already going, but if this is something you’re interested in, I want to encourage you to give it a try! Have you already learned embroidery? What kinds of projects and patterns do you love making? What is your favorite piece?